Quick answer
Go for the large oxygen tank blueprint only after the Standard Air Tank route feels repeatable. The P3 video route shows the real cost: a deep approach, low-O2 movement near a refill point, and a station interaction before the recipe screen. Scout the entrance first, bring a backup oxygen plan, and leave after the objective instead of adding bonus resource farming.
Where this route sits
P3 / Large O2 Tank blueprint
Oxygen upgrade route
- Coordinate status
- Coordinate pending
- Route proof from recipe frame; coordinate still needs a Beacon pass.
- Bring before leaving
- Air Bladder, Silver, and a strict turn-back rule.
Coordinate record
- Video timecode
- 15:30
- Measured coordinate
- Pending Beacon/PDA coordinate
- Depth
- Pending
- Entrance cue
- Follow the oxygen-upgrade route until the recipe frame matches.
- Safe return
- Turn back before low-O2 warning if the recipe room is not found.
Route sub-points
 1
1Deep approach
Start comparing terrain before committing oxygen to the cave.
Pending measured coordinate
Open this sub-point on map 2
2Low-O2 decision point
If the target room is not visible here, return instead of pushing.
Pending measured coordinate
Open this sub-point on map 3
3Large O2 recipe frame
Use this as the first coordinate target once Beacon data arrives.
Pending measured coordinate
Open this sub-point on mapField notes from the P3 video
The danger starts before the station
The video does not become risky only when the recipe UI appears. The risk is already visible during the deep approach and low-O2 route movement.
Do not count refill plants as permission to greed
A refill source helps only if you can reach it calmly and still find the exit. If the route depends on perfect movement, scout first and return later.
The recipe frame is confirmation, not the whole guide
The frame around 15:30 confirms the large oxygen tank station moment. The guide value is the route discipline that gets you there alive.
Video stills for this route
These stills come from the P3 Bilibili video supplied by the site owner. They are route evidence and timing cues, not official fixed coordinates.
Approach pressure before the blueprint
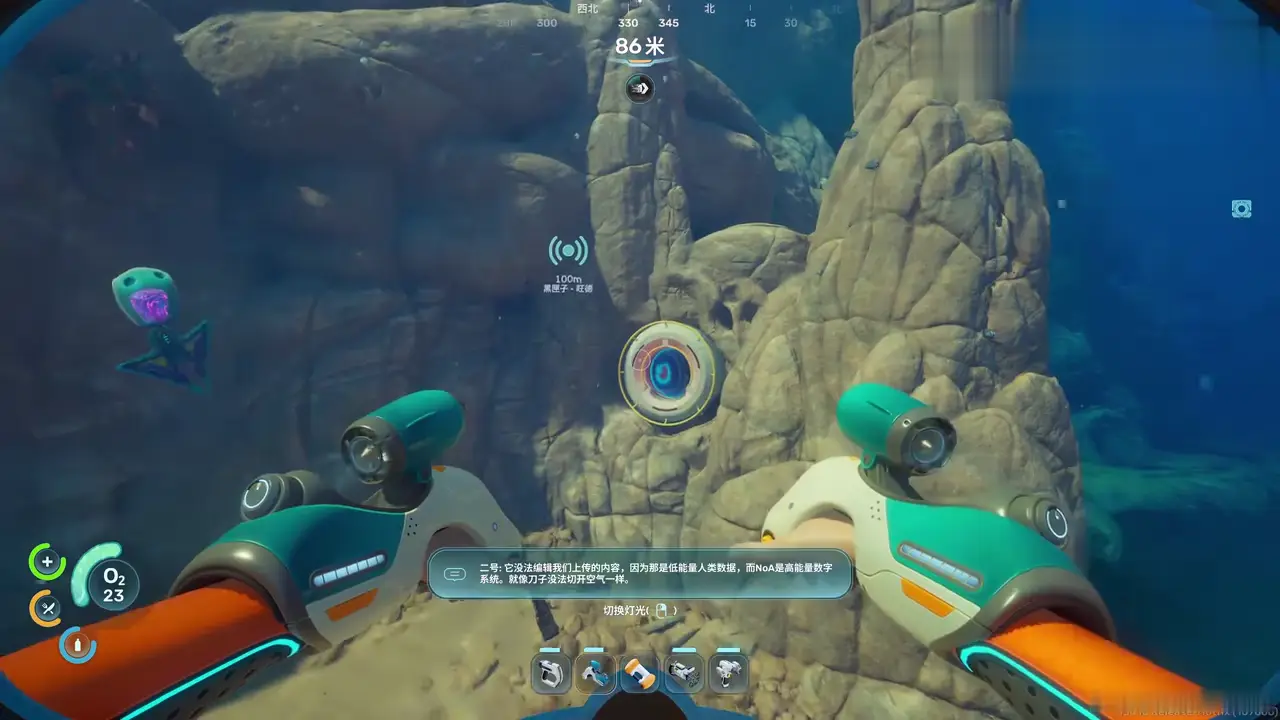
At about 5:08, the P3 route is already near 86 m with only 23 O2 visible. This is the moment to stop treating the blueprint as a quick pickup.
Source: Bilibili P3 route frame, around 05:08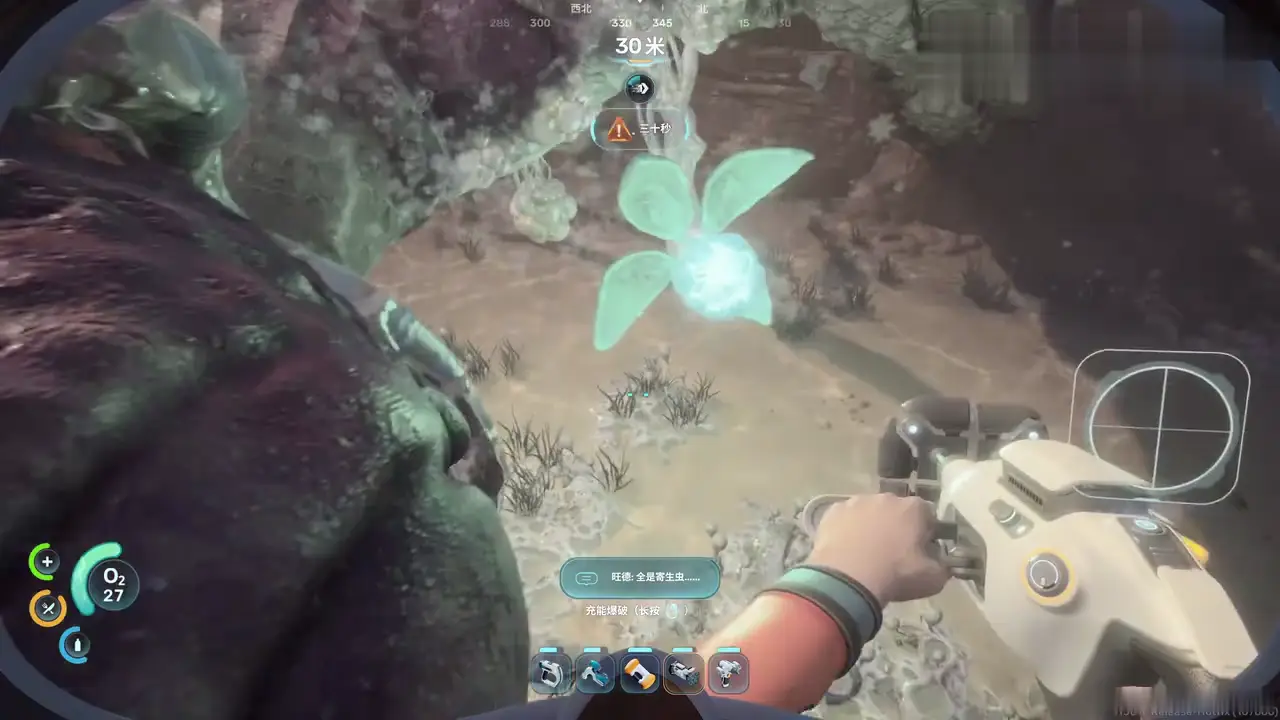
A refill point is not a full plan
At about 10:10, the player is near a refill source but already below 30 O2. The lesson is simple: know the refill and the exit, not only one of them.
Source: Bilibili P3 route frame, around 10:10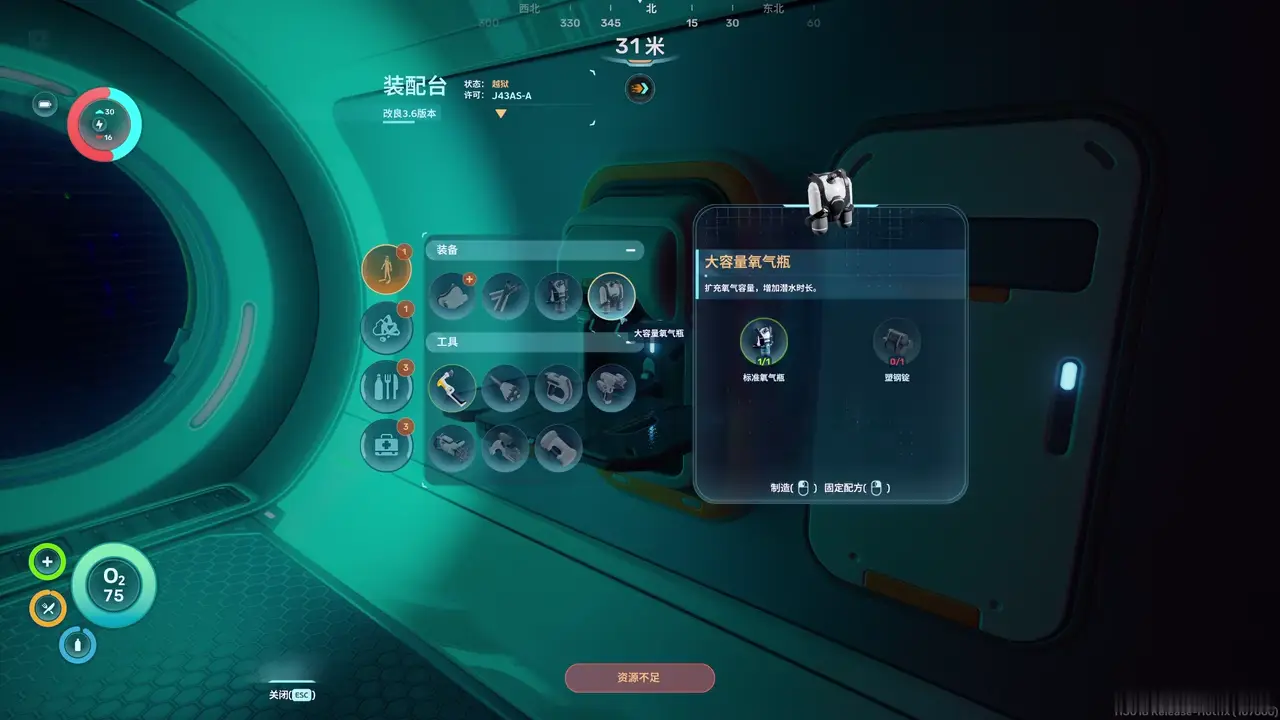
The recipe screen comes after the route
At about 15:30, the large oxygen tank recipe is visible at a station. Use this as a confirmation frame, then re-check materials after every patch.
Source: Bilibili P3 route frame, around 15:30Visual notes and source media
Original route art
Abyss Guides uses original chibi deep-sea art for page visuals instead of copying wiki screenshots or fan uploads.
Source: Abyss Guides original artwork
Official Subnautica 2 gameplay trailer
Use the trailer for mood, vehicles, and biome context. Do not treat trailer scenes as exact farming coordinates.
Source: Official Subnautica YouTube embedHow to run the large oxygen tank route
Prepare with the first tank upgrade
Do not make this your first oxygen experiment. Get comfortable with the Standard Air Tank, Air Bladder backup, and the shallow cave turn-back rules before pushing this route.
Scout the entrance without committing
On the first pass, your job is only to read the approach: depth, landmarks, hostile pressure, and whether a refill source is reliable. Leave with a note instead of forcing the station.
Start the committed run with one objective
When you return, make the large oxygen tank blueprint your only real objective. Do not add extra scans or material farming after the route begins to feel expensive.
Use low-O2 refill moments as warnings
If you reach a refill source below 30 O2, treat that as a route warning. Refill, reset your direction, and leave unless the station and exit are both already known.
Check the recipe screen and leave
The P3 frame shows the large oxygen tank recipe screen at a station. Use it to confirm the upgrade path, then exit and gather missing materials on a separate route.
Route risk card
Green
Commit
Known entrance, known refill, known exit, one objective.
Yellow
Scout
You found the approach but cannot yet explain the return.
Red
Leave
Low O2, unclear exit, and extra tasks are stacking together.
Large oxygen tank route decisions
| Route moment | Best call |
|---|---|
| Deep approach with low O2 | Turn back unless the exit chain is already memorized. |
| Refill source nearby | Use it, but do not treat it as the whole plan. |
| Station or recipe UI appears | Confirm the upgrade, then leave before adding side tasks. |
| Inventory nearly full | Store first. Blueprint routes need mental and inventory space. |
| Missing Plasteel or another recipe material | Leave and farm it separately rather than extending the deep route. |
| Patch changed recipes | Re-check the station before rewriting the plan. |
Do not make the upgrade route bigger than the upgrade
The large oxygen tank helps later routes, but chasing it badly can waste more time than it saves. A clean scout, a clean station check, and a clean return beat one greedy run that loses the entrance and the objective.
FAQ
Where do I get the large oxygen tank blueprint in Subnautica 2?
The P3 footage shows the upgrade tied to a deeper station route rather than a casual shallow pickup. Use the video stills as route cues, then verify the station and recipe in your current patch.
What should I do before chasing it?
Craft the Standard Air Tank, learn a repeatable oxygen route, carry backup oxygen, and keep inventory space open for the objective.
What materials does the recipe use?
The P3 recipe frame shows the large oxygen tank UI and appears to require the prior tank plus a higher-tier ingot. Re-check the station in your build because Early Access recipes can change.
Should I farm materials during the same deep run?
Usually no. Confirm the blueprint or recipe first, leave, then farm missing materials on a separate safer route.